Thursday, March 26, 2009

Lookie what I got!

Hi Stampers,
I dont have a card today, but more are coming soon...I promise. Today I want to show you how cool my husband is.
Look what I got! Monday was my 18th Anniversary, and my wonderful husband sent me these BEAUTIFUL roses! I cant believe how gorgeous they still are. I got them Monday, and took these photos on Thursday night. I cant believe they are still alive! How cool is that!?! Aren't they beauties?

Just for some added fun...for those of you that dont know him...Meet Philip! This has been the gorgeous man in my life for around 19 years. I Love You, Honey, and Thanks for the roses. You're the greatest!

I promise I'll post cards another day, but for today, I just wanted to show you what I got.

Thanks for stopping by.

Have a GREAT day!

~Beth

Wednesday, March 25, 2009

I Bleached It!

Hi Stampers,

For todays card, I wanted to show you how you can use regular household bleach, (even fresh flowers scent...lol) on your stamps. Of course, I also wanted to show you how terrible it looks when you continually have "afterthoughts" and screw up a perfectly good piece of cardstock because your aquapainter with red ink on it touches your cardstock...LOL.
Ok, on to the bleach.
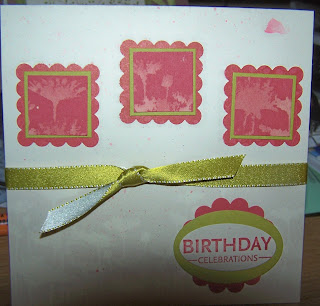
I made a "bleach ink pad" by using a few paper towels in a paper plate, and adding enough bleach to make them kinda mushy. Not SUPER wet, but wet enough to get it on your stamp. Just stamp your stamp into the bleach pad just like you would a regular ink pad. Stamp it onto the paper, and the color starts to fade almost immediately. I tried this on several colors of cardstock, but for whatever reason, I decided to use the red one. I'm kinda a matchy type person, and since the blue paper went sorta yellowish and I didn't have something to match it I didnt use it. Same with another color blue...It's just the way I am...I cant help it. So, long story short, I went with the red. I also used the same stamp, and stamped it directly onto the naturals ivory cardstock. Can you see it at the bottom? You probably could see it better if THAT BIG ROUND SHADOW wasn't in the view. UGH! Anyhow, look closely. It's just subtle enough that it's there, but without a HUGE statement. I used the same stamp and bleached the red, and just punched them out with a 1 inch square punch. I layered them on a piece of Kiwi Kiss, then on to a piece of red that was punched with the scalloped square punch. Tada! Oh yeah, now for the afterthought part...I decided it would be cool to have some red speckles on the cardstock, just to give it something. Yep, it definately gave it something...mainly a big blob at the top right corner...as if you didn't already notice. If you look closely though, you can sorta see little red sprinkles all over. THAT was my plan, but as it is, if you turn your head to answer the phone, your aquapainter might just touch the cardstock and leave a mark...LOL. I prolly would never send this, now that it's totally trashed, but I'm thinking of a way to cover it up and make it work for my card. Let me know if you have any brilliant ideas and I'll post them here. In fact, lets make that the next challenge...How to fix a screw up!


Ok, now I"m rattling. I have another must make card for my anniversary, so I better get busy. Ya'll go Stamp Something!

TaTa

~Beth

Sunday, March 22, 2009

A Birthday Wish

Hi Stampers,

I finally stamped again! This is my new favorite stamp set...mostly because I LOVE this tree! I also love that it comes in Decor Elements. This card is pretty self explanatory, but notice that I crimped the Old Olive cardstock in the back. I also left a little bit bigger matte around the edges than I usually do. I used the Old Olive and Close to Cocoa markers to ink up the stamp, then just stamped it on some white cardstock. Pretty simple...huh?
Notice that there is also the strip of designer series paper at the bottom. That I tell you was an afterthought. It's only there because in my pathetic attempt at paper piercing, I ended up going sideways. How does that happen? I dont know, but since it looked like I'd been seriously drinking, and I hadn't...I added the strip of DSP. I cut it 2 1/2" so that I could fold it in the middle and cover up the back side of the uneven punches as well.


Because I needed to cover those pesky little holes, I also needed to do something to the inside of this card. It probably needed it anyway, since it's Close to Cocoa, and kinda dark to write on. I just took a piece of white carstock, stamped the other image from the same stamp set, added the sentiment...and Done! No, I haven't figured out why there is a round shadow at the bottom of EVERY SINGLE PHOTO I take. If someone out there in blogworld has any clues...please let me know. It's driving me crazy!


Anyway, thats it for today...Now Go Stamp Something!

TaTa

~Beth

Sunday, March 1, 2009

A Sneak Peek!

Hi Stampers,

I told you there would be a special offer today...Are you ready? Beginning today, you can preorder select stamp sets from the Ocassions Mini catalog before you even get it! How awesome is that!?! The regular order period wouldn't begin until April 1, but you can preorder them during the month of March. And guess what else...If you spend $50, it still qualifies you for a FREE Sale-A-Bration item. SWEET!

I tried to upload the photos of the stamp sets, but evidently you need to be more technologically sound than I am, SOO, if you are interested in what they look like, and I KNOW you are...email me at pblowery@centurytel.net and I will send you a copy of the PDF file. Just trust me here....these sets are adorable, and so perfect for Easter.

Have a great day!

~Beth


Edited to add:

Ok, I got it. Actually I copied them from someone else who knows how to put the photos on here. Anyhow, here are the adorable stamp sets that are available for preorder.

113196 An Egg-cellent Easter $21.95

113262 Wagon Full of Fun $34.95
113822 Eight Great Greetings $27.95 (Also available in Spanish and French)
113833 Egg Hunt Stampin' Around wheel $6.50